|
Getting your Trinity Audio player ready...
|
This post was first published on Medium.
Introduction
In the world of digital security, cryptography plays a crucial role in ensuring the integrity and authenticity of data. One widely used cryptographic technique is the use of Pretty Good Privacy (PGP)¹. PGP provides encryption and authentication for secure communication, such as email, file transfers, and data storage.
PGP can use the same elliptic curve as in Bitcoin called secp256k1, thus it can be made compatible with and leveraged in Bitcoin. An existing PGP elliptic key key pair can be reused as a Bitcoin key pair, so we can:
- send bitcoins to one’s address derived from her PGP public key. Only she can spend the bitcoins with the PGP private key.
- sign messages that can be trusted to come from a PGP user.
In this article, we will dive into the example of a trusted oracle generating a PGP signature using the secp256k1 elliptic curve, which is verified and used on-chain using sCrypt.
Generate a PGP signature
The first step is to make sure your machine has GnuPG installed. It’s a very widely used program and you probably already have it on your system.
Generate a private key
Run the following command:
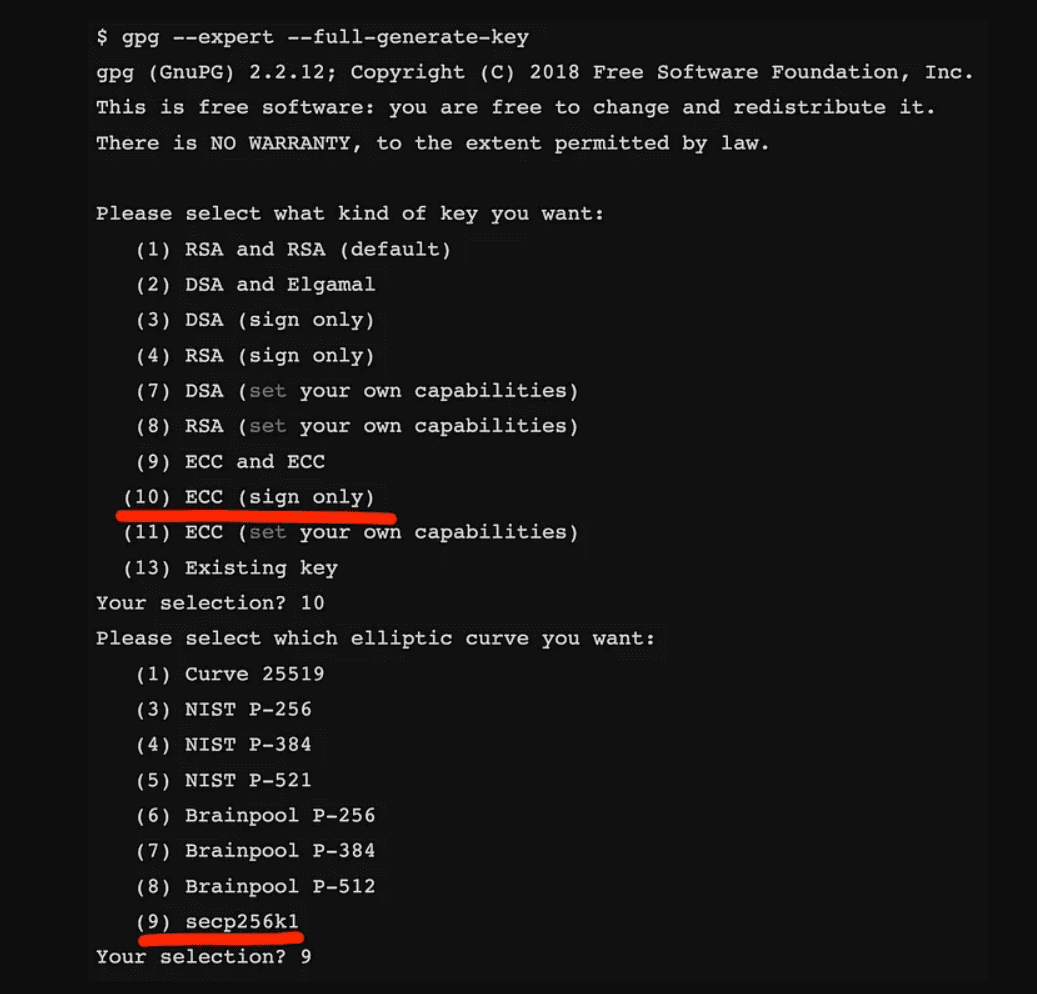
gpg –full-gen-key –expert
This will run an interactive prompt for generating your key. When it asks you to select that you want a ECC key for signing, using “secp256k1” as the curve.

Once done you will have a new key stored on your system. To list all the keys, run this:
gpg –list-keys –with-fingerprint
Create a signature
Because the signature we will verify in Bitcoin needs to be in its raw form (r, s), we have prepared a tool that extracts this data from files generated by GnuPG. Clone it from GitHub with the following command:
git clone https://github.com/sCrypt-Inc/parse-pgp-sig && cd parse-pgp-sig
This tool is a fork of the original, written by Mark Blundeberg.
Now, let’s sign a message that is stored inside the “testmsg” file. First, edit the key ID in “makesig.sh” to use the ID of the key you’ve created in the previous step. Then run the following:
./makesig.sh
This will create a file named “testmsg.sig”, which contains the signature. Because we also need our public key, we must export it like:
gpg –output pubkey.gpg –export <KEY_ID>
Lastly, run the following:
./parsesig.py
This will print all the data needed in the right format, to be used for verification. The output should look something like the following:
pubkey.gpg loaded, key ID AF73C8F7B546F94B39317588BC4509E6210D4B78
Public key point coordinates:
x = 48421684640566418104679532805542050894296452248858999768503364580534732096841
y = 27832515582888013475460648727797934257300201948678282835754427898215825506626
Message: b'Hello world!\n'
Message hex: 48656c6c6f20776f726c64210a04001308001d162104af73c8f7b546f94b39317588bc4509e6210d4b7805026453693704ff00000023
Sig:
r: 64359296802826103123327210017080540130282890114880640962625134547151700407256
s: 8795100933587794005356181940782496292717652651227485898667966611241902738847
Signature validity on message: True
Verify the signature in Bitcoin
Here’s a simple sCrypt smart contract, which can verify the signature we just created.
As we can observe, the deployed contract stores the raw message as a contract property. Once someone calls the “unlock” public method, it hashes this message and converts it to an integer and then proceeds to verify the signature using our “SECP256K1” library. You can import this library from our scrypt-ts-lib package.
With the data from above we would initialize and call the contract like this:
Once we have verified the message, we can use it in our contract, confident that it comes from a given PGP user.
References
NOTE:
[1] Hal Finney, an early Bitcoin contributor who received the first Bitcoin transaction from Bitcoin’s creator Satoshi Nakamoto, worked for the PGP Corporation, where he developed some of the earliest PGP code.
Watch: sCrypt founder talks smart contracts on BSV at CoinGeek London

 02-11-2026


