07-25-2026


|
Getting your Trinity Audio player ready...
|
This post originally appeared on Medium and we republished with permission from Xiaohui Liu.
We show the complete workflow of the design, development, testing, deployment, and invocation process of smart contracts in sCrypt.
Design
The first step in building any smart contract is a high-level design. Here we choose to implement a common transaction type Pay To Public Key Hash (P2PKH) in the Bitcoin network. There are two main reasons to use this type of transaction as an example:
- P2PKH is the most popular type of transactions in the Bitcoin network used to sending bitcoins from one to another, which is necessary for beginners to understand
- By implementing this classic transaction type, one can more intuitively understand the capabilities and usage of Script/sCrypt
What’s P2PKH?
Its locking script is:
OP_DUP OP_HASH160 <Public Key Hash> OP_EQUALVERIFY OP_CHECKSIG
Its unlocking script is:
<Signature> <Public Key>
Receiving of P2PKH
If Alice wants to transfer bitcoins to Bob, Bob first needs to tell Alice his public key hash value (usually known as the Bitcoin address, which is similar to a bank account number). Alice uses this value to construct a P2PKH locking script (here denoted as LS¹) and sends the transaction to the miner. After the miner verifies that it is correct, the transaction is recorded on chain.
Spending of P2PKH
When Bob wants to spend the bitcoins received, he needs to provide two pieces of information to construct an unlocking script:
- The original public key that the above public key hash value is calculated from;
- A Signature calculated by using the private key corresponding to the original public key.
After constructing the unlocking script and placing it in a transaction, Bob broadcasts the transaction.
Verification of P2PKH
When miners receive the new transaction, they need to validate it, which involves two main steps:
- Concatenate the unlocking script with the locking script to form the following verification Script:
<Signature> <Public Key> OP_DUP OP_HASH160 <Public Key Hash> OP_EQUALVERIFY OP_CHECKSIG
- Use the Bitcoin Virtual Machine to execute this verification Script to check whether the execution result is valid. There are two critical checks in the verification process:
- Verify that the hash, which can be calculate by the public key information provided in the unlocking script, is equal to the hash provided in the locking script. If it passes, the public key is indeed the recipient address of the previous transaction. (It is equivalent to verifying that the receiving address of the previous transfer is Bob’s bank account number)
- Verify that the signature provided in the unlocking script matches the public key information. If it passes, it means that Alice does have control over the private key corresponding to this public key.
If the verification passes, it proves that Alice does own and can control the bitcoins, and the miner will record the new spending transaction on chain. This is the main process and principle of P2PKH type transactions.
In summary, our goal for contract design is also very clear: to implement a sCrypt contract that is equivalent to the function of P2PKH.
Development
With this design goal in mind, we can get started. Firstly, we install the sCrypt extension in VS Code.
A sample project is provided for anyone to quickly learn how to develop and test sCrypt contracts. It is a good place to start. First clone the project locally, using the command:
Actually, the P2PKH contract we wanted is included in the project. So let us look directly at the code at contracts/p2pkh.scrypt.
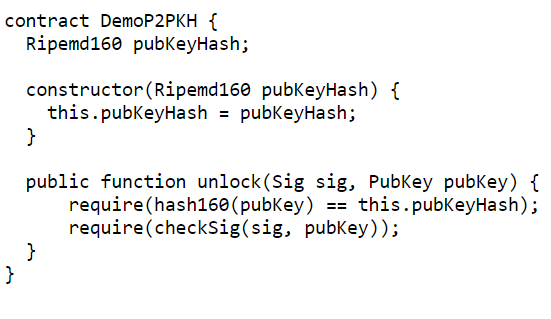
The main body of the contract includes:
- A contract variable pubKeyHash of type Ripemd160, corresponding to the previous P2PKH locking script <Public Key Hash> ;
- Constructorconstructor, used to initialize the contract variable;
- A custom public function named unlock which has two parameter with type Sig and PubKey, corresponding to the previous P2PKH unlocking script<Signature> <Public Key>.The implementation logic also corresponds to the P2PKH validation described earlier.
It is obvious that the sCrypt implementation is much easier to learn and write than previous scripts. And the more complex the contractual logic, the more obvious the advantage of using sCrypt is.
Unit testing
With the code, the next step is to verify that the implementation is correct, and the normal way to do this is to add some unit tests. The test file for the above contract is tests/js/p2pkh.scrypttest.js, the code is as follows:
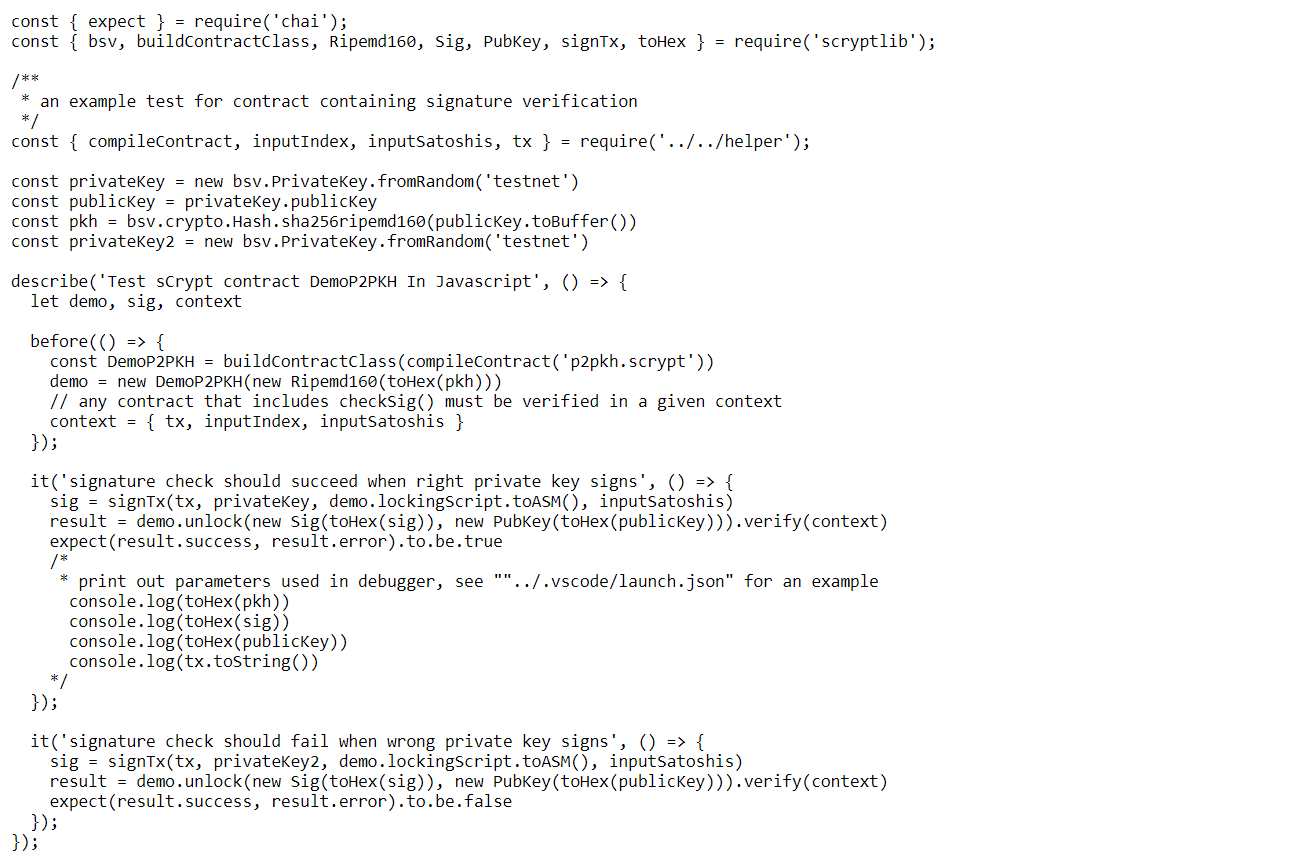
Anyone familiar with JavaScript might immediately recognize that this is a pure JS test file based on the MOCHA + Chai framework. Let’s take a closer look at this test case.
- First Import sCrypt’s Javascript/Typescript library scrypttest:
const { buildContractClass, bsv } = require(‘scrypttest’);
- Use the function buildContractClass to get the class object reflected into Javascript of the contract DemoP2PKH:
const DemoP2PKH = buildContractClass(path.join(__dirname, ‘../../contracts/p2pkh.scrypt’), tx, inputIndex, inputSatoshis)
- Use arguments (that is, the hex format of the public key hash) to instantiate the contract:
demo = new DemoP2PKH(toHex(pkh))
- Test the public method of the contract instance and expect it to succeed:
sig = signTx(tx, privateKey, demo.getLockingScript())
expect(demo.unlock(toHex(sig), toHex(publicKey))).to.equal(true);
- Expect it to fail if the signature cannot be verified because the wrong private key is used:
sig = signTx(tx, privateKey2, demo.getLockingScript())
expect(demo.unlock(toHex(sig), toHex(publicKey))).to.equal(false);
Before running the test, we need to run npm install in the root directory of the project to ensure that the dependencies have been successfully installed. Then right click the test file in VS Code editor and select “Run sCrypt Test” ; The result is shown in the “Output” view.
Debug
Having only the above unit test is not enough, because when the test fails, we can hardly figure out why and there is no more information to help us pinpoint the problem. Enter the sCrypt Debugger.
A sample debug configuration for the DemoP2PKH contract can be found in the file .vscode/launch.json :
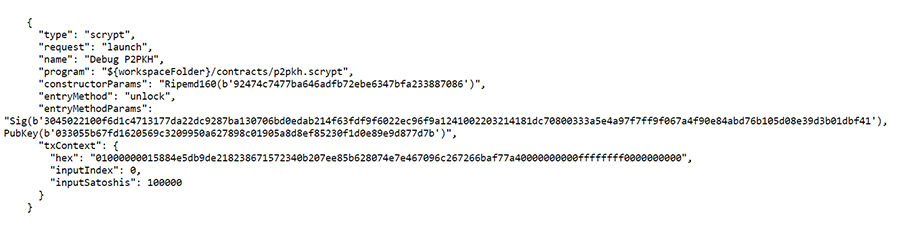
The key parameters are:
- program: the contract file for this debug configuration.
- constructorParams: the contract’s constructor argument list, separated by comma.
- entryMethod: specifies the public function name to be debugged.
- entryMethodParams: specify the actual argument list of the public function to be debugged, also separated by comma.
- txContext: specifies context information about the current transaction at debugging time, where:
- txContext.hex: the hex format of the transaction, can be signed or unsigned.
- txContext.inputIndex: the input index corresponding to the contract-locked UTXO to be spent.
- txContext.inputSatoshis: The amount of bitcoins corresponding to the contract-locked UTXO to be spent, in unit of satoshi.
So how does one obtain these arguments in general? Looking back at the previous test file, you can see that there are several log statements commented out:

This log is exactly what you need for the debug configuration, and you can get it for other contracts in a similar way.
With the configuration in place, you can use the “F5” shortcut to start code debugging. See the previous article and the official VS Code documentation for details of what the debugger does and how to use it.
Deploy and Call the Contract
Before using a contract in a production environment, a developer should test on testnet to ensure that the contract code meets expectations. For the example in this article, you can run the command node tests/testnet/p2pkh.js in the project root directory.
Preparations
When we first run the file, we see output like this:
New privKey generated for testnet: cMtFUvwk43MwBoWs15fU15jWmQEk27yJJjEkWotmPjHHRuXU9qGq
With address: moJnB7AND5TW8suRmdHPbY6knpfE1uJ15n
You could fund the address on testnet & use the privKey to complete the test
Because the code requires two things to work:
- A private key on the test network is required;
- The private key has sufficient balance in the corresponding address for testing.
If you already have such a private key, you can find and modify the following line of code (using a private key in WIF format instead of a empty character) :
const privKey = ”
Of course, you can also use the private key in the output above, but first you need to get the test coin for the address in the output, such as on this site.
Expected Result
With the aforementioned setup in place, you are ready to run the command again. Normally you would see the following output:
Contract Deployed Successfully! TxId: bc929f1dddc6652896c7c162314e2651fbcd26495bd1ccf9568219e22fea2fb8
Contract Method Called Successfully! TxId: ce2dba497065d33c1e07bf710ad94e9600c6413e053b4abec2bd8562aea3dc20
The above result shows that the contract deployment and call have been successful, and you can go to a blockchain browser to see the corresponding transaction details (using the txid in the output results) .
The full code is available at deployments/p2pkh.js.
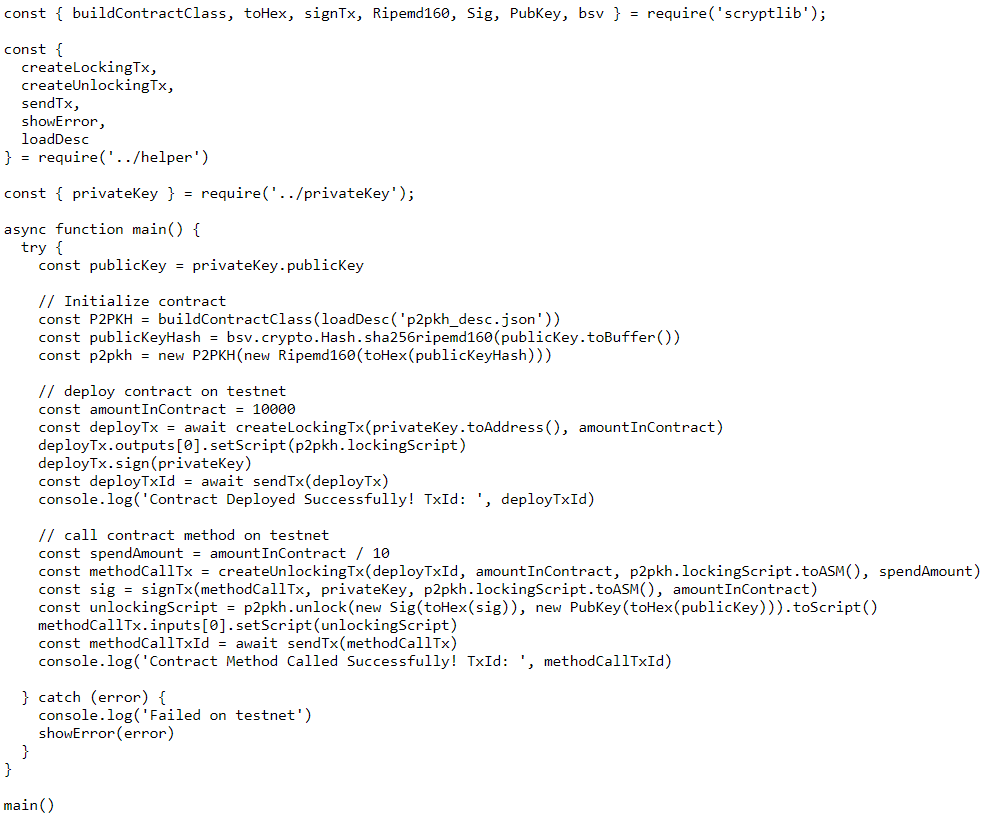
Let’s take a look at the specific implementation of contract deployment and invocation.
Contract Deployment
- Create a new locking transaction:
const amountInContract = 10000
const deployTx = await createLockingTx(privateKey.toAddress(), amountInContract)
- Set the script for the output to be the locking script above:
deployTx.outputs[0].setScript(p2pkh.lockingScript)
- Transaction Signature:
deployTx.sign(privateKey)
- Broadcast transaction to the bitcoin network:
const deployTxId = await sendTx(deployTx)
Contract Call
- Create a new unlocking transaction:
const spendAmount = amountInContract / 10
const methodCallTx = createUnlockingTx(deployTxId, amountInContract, p2pkh.lockingScript.toASM(), spendAmount)
- Get a signature for this transaction:
const sig = signTx(methodCallTx, privateKey, p2pkh.lockingScript.toASM(), amountInContract)
- Get the unlocking script corresponding to the contract method call.
const unlockingScript = p2pkh.unlock(new Sig(toHex(sig)), new PubKey(toHex(publicKey))).toScript()
- Set the corresponding input script to the above unlocking script:
methodCallTx.inputs[0].setScript(unlockingScript)
- Send transaction to the network:
const methodCallTxId = await sendTx(methodCallTx)
Conclusion
We walk through an example of developing a smart contract on Bitcoin, which serves a starting point for developing more.
Translated from article by Yiqiang Wang with help of Hongfeng Zheng.
Recommended for you